This is an old revision of the document!
Table of Contents
 Important!
These guides are adequate only for the actual programversions which are available at this documentation’s publication time. These tools are developing continuously so the guides could become outdated with the appearance of a new version. If these conversions may not work, please write us at support@adverticum.com e-mail address.
Conversion and upload of Flash banners with Swiffy
Swiffy is a free Google product which is able to convert most Flash creatives to HTML. This service is available here:
https://developers.google.com/swiffy/convert/upload
The following documentation means a great help for managing the conversion of embedded Flash-based banners. For a perfect implementation those creatives are needed which agreed the suggestions in the Banner Creation Guide:
Conversion steps
1. Choose the needed file by clicking on the “Choose file” button and accept the terms and conditions by clicking on the given checkbox.
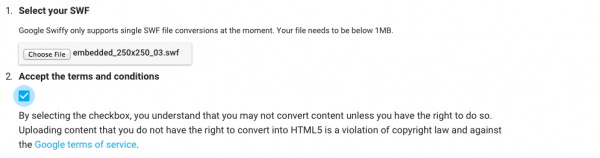
2. Click on the “UPLOAD” button to upload the file.

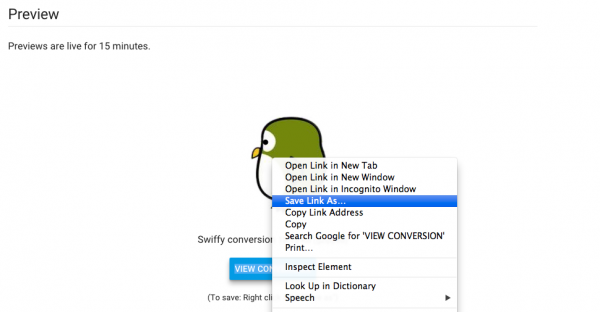
3. Following the successful conversion save the generated HTML file by clicking on the “VIEW CONVERSION” with right mouse button.
Modifying the converted file for matching the Adverticum AdServer’s specification
The saved HTML file is not ready to the adserving yet so some modifications are necessary in the code. The changes will make it possible to give the clickTAG and clickTARGET variables to the banner. It does not matter, if the creative does not use the last mentioned variable.
1. Open the saved file in a text/code editor (e.g. Notepad++).
2. Search the following part in the last section of the code:
    <script>

      var stage = new swiffy.Stage(document.getElementById('swiffycontainer'),
          swiffyobject, {});

      stage.start();
    </script>
3. Insert the following code line before the stage.start(); object:
stage.setFlashVars(location.search.split('?')[1]);
After that the code needs to be similar to this one:
    <script>

      var stage = new swiffy.Stage(document.getElementById('swiffycontainer'),
          swiffyobject, {});

      stage.setFlashVars(location.search.split('?')[1]);
      stage.start();
    </script>
4. Save the file.
Uploading the banner to AdServer
To run the converted banners we need to use HTML banner. Regarding the uploading process of HTML banners there is a guide in our Knowledgebase:
The main difference between the common banner and the HTML banner is that here we do not use the content of the HTML banner as a source – instead of that the following code line should be inserted. In our example the filename is embedded_250x250_03.html and its size is 250px x 250px.
<iframe src="[file:embedded_250x250_03.html]?clickTAG=[cthref.e]&clickTARGET=[target]" style="width: 250px; height: 250px; border: none;"></iframe>
1. All banners’ file name and the size should be modified in the code. If our banner’s name is example-banner.html and its size is 728px x 90px, the above detailed code line should be modified as you can see in the following example:
<iframe src="[file:example-banner.html]?clickTAG=[cthref.e]&clickTARGET=[target]" style="width: 728px; height: 90px; border: none;"></iframe>
2. As a next step, the modified HTML file should be uploaded in the banner’s file list by clicking on the “Add File” button.
3. After that click on the “Save” button.
Conversion and upload Adobe Edge codes
The Adobe Edge is an image editor software which can be used to HTML5 banners. More information is available here:
https://creative.adobe.com/products/animate
To be able to run the banner as a HTML banner with the right references and clicks there are some modifications needed in the code. The conversion steps and the uploading method will be detailed hereinafter. About the requirements of the HTML5 banners (Markup banner’s requirements are irrelevant here) more information are available in our Knowledgebase:
Conversion of the banner
1. Creatives generated in Adobe Edge usually order the linked files into folders. As a first step, move all files to the same folder which contains the .html file.
2. Open the banner’s .js file in a text/code editor (e.g. Notepad++).
Important!
- It is possible that more .js files belong to the banner if it was created with different Edge-versions
- In case of
5.x.xthe 3rd step should be done in the bannerName_edge.js, while the 4th step should be done inthe bannerName_edgeActions.js. - In case of
6.x.xall modifications should be made in thebannerName_edge.js.
3. Search the following expression:
images/
Here are the following folder-references as an example (we've only display the part of the code that's relevant):
/*...*/ ;var im='images/',aud='media/',vid='media/',js='js/',fonts= /*...*/
These references should be replaced to empty string in order to have the similar code line which we show hereinafter. With this step the banner will find the images in its folder and not in their previous folder:
/*...*/ ;var im='',aud='',vid='',js='',fonts= /*...*/
4. To manage the clicks the following expression should be found:
window.open
Here are the following references as an example (again, we've only display the part of the code that's relevant):
/*...*/ "click",function(sym,e){
    window.open("http://adverticum.com","_blank");
});
In order to avoid the insertion of the landing page into the code, the following code line should be used instead of the given link:
decodeURIComponent(location.search.split('?')[1].split('=')[1])
After the changes the code should be the following:
/*...*/ "click",function(sym,e){
    window.open(decodeURIComponent(location.search.split('?')[1].split('=')[1]),"_blank");
});
It is important that the “_blank” expression should be after the URL because without that the landing page will not be opened in a new window.
Uploading the banner to AdServer
To run the converted banners we need to use HTML banner. Regarding the uploading process of HTML banners there is a guide in our Knowledgebase:
The main difference between the common banner and the HTML banner is that here we do not use the content of the HTML banner as a source – instead of that the following code line should be inserted. In our example the filename is embedded_250x250_03.html and its size is 250px x 250px.
<iframe src="[file:embedded_250x250_03.html]?clickTAG=[cthref.e]" style="width: 250px; height: 250px; border: none;"></iframe>
1. All banners’ file name and size should be modified in the code. If our banner’s name is example-banner.html and its size is 728px x 90px, the above detailed code line should be modified as you can see in the following example:
<iframe src="[file:example-banner.html]?clickTAG=[cthref.e]" style="width: 728px; height: 90px; border: none;"></iframe>
2. As a next step, all files should be uploaded in the banner’s file list by clicking on the “Add file” button.
3. After that click on the “Save” button.
Google Web Designerrel készült bannerek átalakítása és felvétele
Google Web Designer [GWD for short] is a free HMTL editor which is available in the following link:
https://www.google.com/webdesigner/
It is easy to convert banners with GWD to Adverticum-compatible HTML banners. The conversion steps and the uploading method will be detailed hereinafter. About the requirements of the HTML5 banners (Markup banner’s requirements are irrelevant here) more information are available in our Knowledgebas:
A banner átalakítása
1. Open the folder of the published banner.
2. Open the given .html file with a text/code editor (e.g. Notepad++).
3. 3. The source code of HTML banner will be inserted into the <body> tag so the banner’s code should contain only the most important valid (which are also in the <body> tag valid) elements. The unnecessary elements are usually the <!DOCTYPE>, <html>, <head>, <body> and <meta> tags. The last element should not be deleted compulsorily but the browser will leave it out of consideration because they are only relevant in the <head> tag according to the standard. If <meta> tags are needed, they can remain in the code.
Our code will be the following at the start period:
<!DOCTYPE html>
<html>

<head data-gwd-animation-mode="quickMode">
  <link href="gwdimage_style.css" data-version="1.4" data-exports-type="gwd-image" rel="stylesheet">
  <link href="gwddoubleclick_style.css" data-version="1.9" data-exports-type="gwd-doubleclick" rel="stylesheet">
  <link href="gwdpagedeck_style.css" data-version="1.5" data-exports-type="gwd-pagedeck" rel="stylesheet">
  <script data-source="custom.elements.min.js" type="text/javascript" src="custom.elements.min.js"></script>
  <meta name="generator" content="Google Web Designer 1.3.2.0521">
  <meta name="template" content="Banner 2.2.0">
  <meta name="environment" content="gwd-doubleclick">
  <meta http-equiv="Content-Type" content="text/html; charset=utf-8">
  <meta name="viewport" content="width=device-width, initial-scale=1.0">
  <style type="text/css" id="gwd-lightbox-style">
    !The stylesheet...
  </style>
  <script data-source="gwdpage_min.js" data-version="1.2" data-exports-type="gwd-page" type="text/javascript" src="gwdpage_min.js"></script>
  <script data-source="gwdpagedeck_min.js" data-version="1.5" data-exports-type="gwd-pagedeck" type="text/javascript" src="gwdpagedeck_min.js"></script>
  <script data-source="https://s0.2mdn.net/ads/studio/Enabler.js" data-exports-type="gwd-doubleclick" type="text/javascript" src="https://s0.2mdn.net/ads/studio/Enabler.js"></script>
  <script data-source="gwddoubleclick_min.js" data-version="1.9" data-exports-type="gwd-doubleclick" type="text/javascript" src="gwddoubleclick_min.js"></script>
  <script data-source="gwdimage_min.js" data-version="1.4" data-exports-type="gwd-image" type="text/javascript" src="gwdimage_min.js"></script>
</head>

<body>
  <gwd-doubleclick id="gwd-ad" polite-load="">
    <gwd-metric-configuration></gwd-metric-configuration>
    <div is="gwd-pagedeck" class="gwd-page-container" id="pagedeck">
      <div is="gwd-page" id="page1" class="gwd-page-wrapper gwd-page-size gwd-lightbox" data-gwd-width="300px" data-gwd-height="250px">
        <div class="gwd-page-content gwd-page-size">
          <img is="gwd-image" source="assets/pingvin.png" id="gwd-image_1" class="gwd-img-zjez gwd-gen-l5pfgwdanimation">
        </div>
      </div>
    </div>
  </gwd-doubleclick>
  <script type="text/javascript" id="gwd-init-code">
    // The script...
  </script>
</body>

</html>
After deleting the unnecessary elements the code will be modified as in the following example:
  <link href="gwdimage_style.css" data-version="1.4" data-exports-type="gwd-image" rel="stylesheet">
  <link href="gwddoubleclick_style.css" data-version="1.9" data-exports-type="gwd-doubleclick" rel="stylesheet">
  <link href="gwdpagedeck_style.css" data-version="1.5" data-exports-type="gwd-pagedeck" rel="stylesheet">
  <script data-source="custom.elements.min.js" type="text/javascript" src="custom.elements.min.js"></script>
  <style type="text/css" id="gwd-lightbox-style">
    !The stylesheet...
  </style>
  <script data-source="gwdpage_min.js" data-version="1.2" data-exports-type="gwd-page" type="text/javascript" src="gwdpage_min.js"></script>
  <script data-source="gwdpagedeck_min.js" data-version="1.5" data-exports-type="gwd-pagedeck" type="text/javascript" src="gwdpagedeck_min.js"></script>
  <script data-source="https://s0.2mdn.net/ads/studio/Enabler.js" data-exports-type="gwd-doubleclick" type="text/javascript" src="https://s0.2mdn.net/ads/studio/Enabler.js"></script>
  <script data-source="gwddoubleclick_min.js" data-version="1.9" data-exports-type="gwd-doubleclick" type="text/javascript" src="gwddoubleclick_min.js"></script>
  <script data-source="gwdimage_min.js" data-version="1.4" data-exports-type="gwd-image" type="text/javascript" src="gwdimage_min.js"></script>
  <gwd-doubleclick id="gwd-ad" polite-load="">
    <gwd-metric-configuration></gwd-metric-configuration>
    <div is="gwd-pagedeck" class="gwd-page-container" id="pagedeck">
      <div is="gwd-page" id="page1" class="gwd-page-wrapper gwd-page-size gwd-lightbox" data-gwd-width="300px" data-gwd-height="250px">
        <div class="gwd-page-content gwd-page-size">
          <img is="gwd-image" source="assets/pingvin.png" id="gwd-image_1" class="gwd-img-zjez gwd-gen-l5pfgwdanimation">
        </div>
      </div>
    </div>
  </gwd-doubleclick>
  <script type="text/javascript" id="gwd-init-code">
    // The script...
  </script>
4. If the banner’s code is bigger than 63KB after these changes, it is useful to write the code’s <style> tag content into an other CSS file. Our code’s this part is the following in normal case:
  <script data-source="custom.elements.min.js" type="text/javascript" src="custom.elements.min.js"></script>
  <style type="text/css" id="gwd-lightbox-style">
    html, body {
      width: 100%;
      height: 100%;
      margin: 0px;
    }
    !The rest of the stylesheet...
  </style>
  <script data-source="gwdpage_min.js" data-version="1.2" data-exports-type="gwd-page" type="text/javascript" src="gwdpage_min.js"></script>
For this operation create a file (e.g. example-style.css). According the above mentioned sample-code the new file contains the total <style> tag content:
    html, body {
      width: 100%;
      height: 100%;
      margin: 0px;
    }
    !The rest of the style sheet...
In our original HTML file the <style> tag should be replaced to <link> tag which will change the code according to the followings:
  <script data-source="custom.elements.min.js" type="text/javascript" src="custom.elements.min.js"></script>
  <link href="example-style.css" rel="stylesheet">
  <script data-source="gwdpage_min.js" data-version="1.2" data-exports-type="gwd-page" type="text/javascript" src="gwdpage_min.js"></script>
5. Modify the files’ pathname where it is necessary because the banner uses relative URL in the code (e.g. image, CSS and external js references).
In case of modifying Image banner’s URL eg.:
<img is="gwd-image" source="assets/pingvin.png" id="gwd-image_1" class="gwd-img-zjez gwd-gen-l5pfgwdanimation">
This should be replaced to AdServer variables:
<img is="gwd-image" source="[pingvin.png]" id="gwd-image_1" class="gwd-img-zjez gwd-gen-l5pfgwdanimation">
6. For managing clicks there are more solutions. If we use <a> tag, it should contain <href> value [cthref].
<a href="[cthref]">Click...</a>
In case of handling click with javascript:
window.open('[cthref]', '_blank');
A banner felvétele az AdServerbe
Banner could be uploaded as usual. We need a HTML banner. As its source code we should use the HTML source code which was created with GWD and converted according to the above mentioned modifications. After that the necessary JS, CSS and image files should be uploaded. More information about the HTML banners in general are available in the following link: